


.svg)


On 20th December 2018, the NCSC released an updated report on the threat actor APT10 (following their 29th August 2018 report). APT10, a known threat actor since 2009, targets defence, healthcare, aerospace, mining and other industries. The NCSC has stated that within the UK, APT10 has principally used the remote access trojan (RAT) Quasar RAT to steal data. Quasar RAT is an open-source RAT coded in C# that has been utilised by everyone from script kiddies to full APT groups. In this article, we will will take you through the process of analysing a Quasar RAT sample and discuss our decisions.
When analysing a suspected RAT, the first thing an incident response team wish to know is the command and control centre's domain. This is usually so they can block this domain from their network and at least begin fighting the malware. The goal then becomes identifying as many indicators of compromise as possible.
Analysis
After sourcing a malware sample, our first port of call was identifying the Quasar Rat’s source code, which can be found here: QuasarRAT. RAT as a service has become big business for attackers, as they can create remote access tools and sell them as samples to interested parties. However, this means that each sample purchased in this manner is likely to be encrypted in the same way (especially if used by a script kiddie). Advanced threat actors will likely change the encryption algorithm to better suit their security practices.
Attackers who have purchased a sample will only need to update a few lines of code before deploying their malware in the wild (this being their C2 domain, encryption key and other such information that will be discussed later). Normally this is done as a resource file within a Windows executable, but within Quasar we can see it is in Quasar.Client/Config/Settings.cs. The attacker simply needs to update the fields within this file, compile, and then send the malware out.
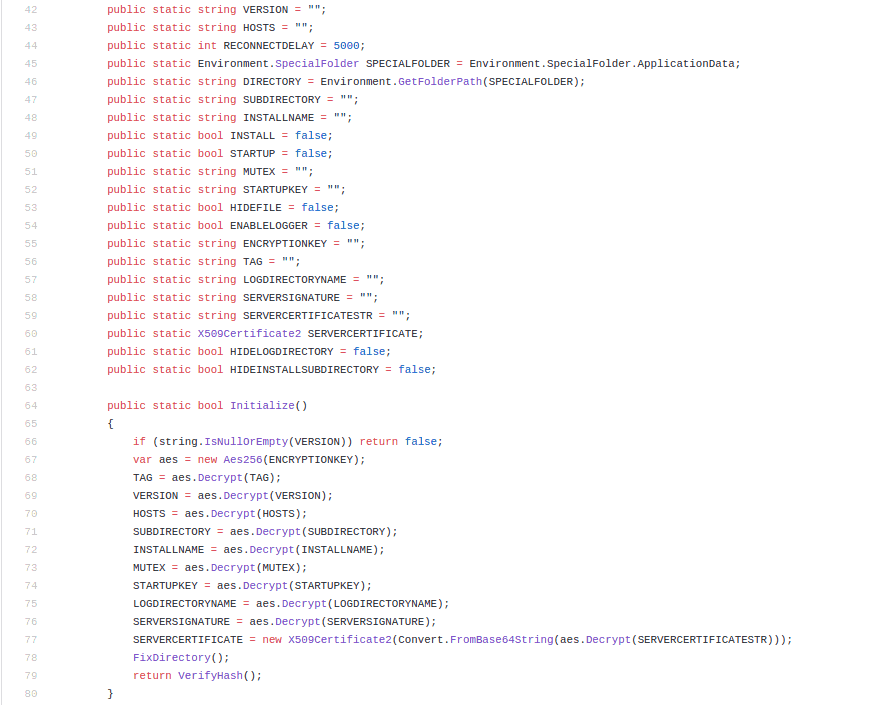
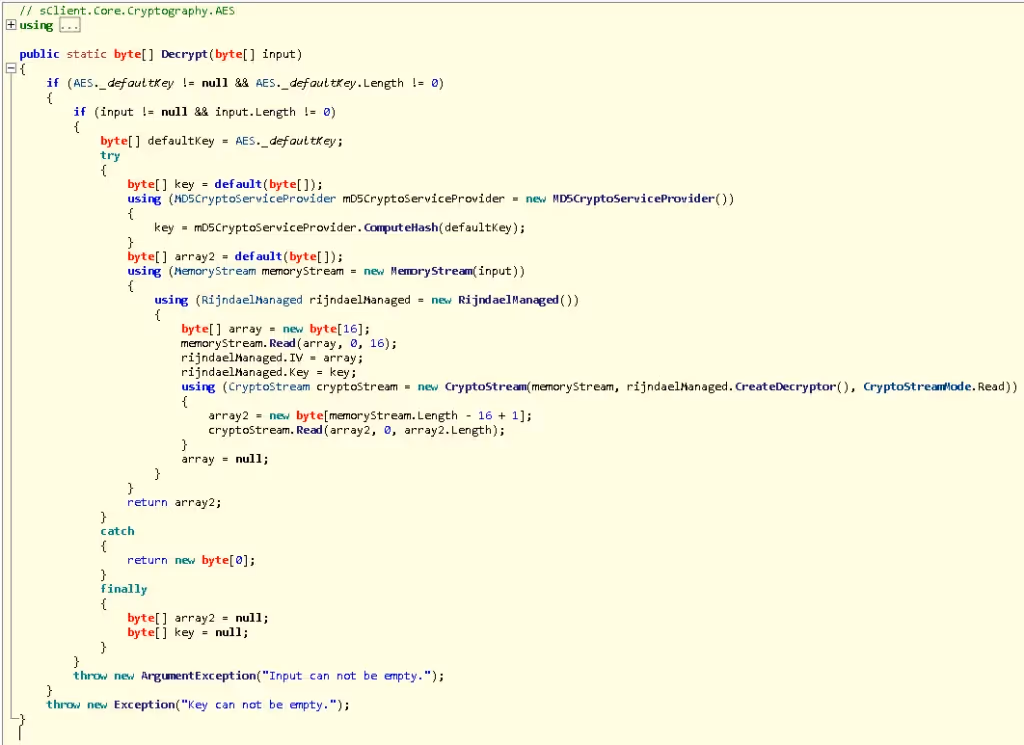
As you can see, the C# coded RAT initialises each field within this file by calling a function within the class AES - aes.Decrypt.
Analysis of the source code was helpful as it provided us with valuable information and helped us understand where we should direct our efforts – something that isn’t always clear when analysing malware. For example, looking inside the cryptography directory within the RAT, you will find standard encryption – nothing fancy or difficult to reverse.
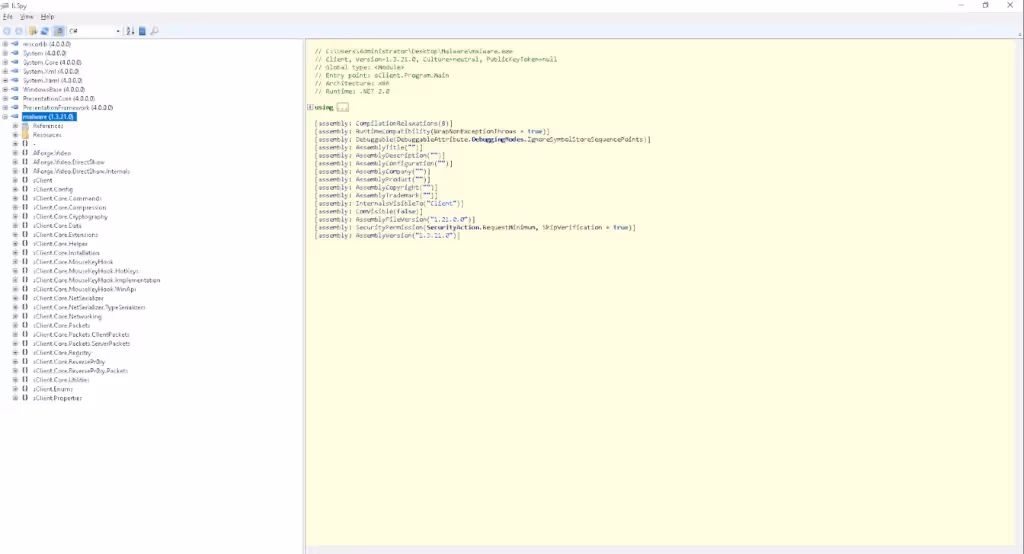
As we know the RAT is coded in C#, we can open the sample inside ILSpy, a .net decompiler that will bring the Windows executable back to its original source code. So far, so good.
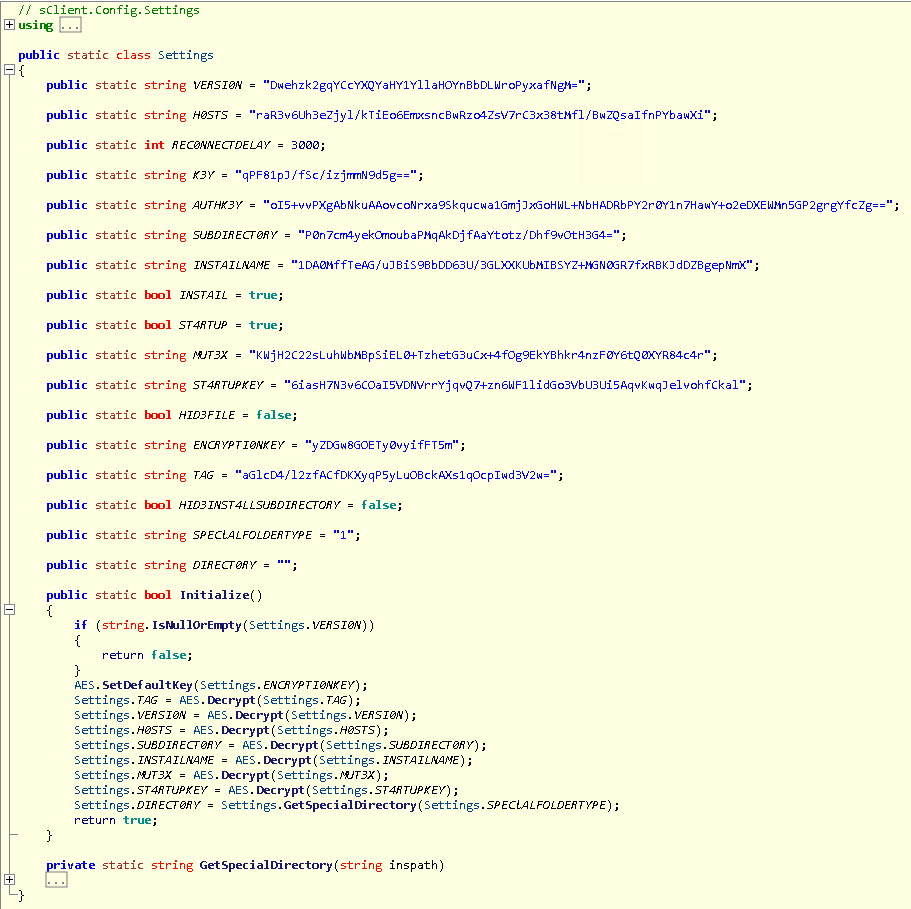
We proceed to sClient.Config/Settings to find what looks like various Base64-encoded strings and an initialise function. Perfect. It looks to be following a similar process to decrypt the strings within this file; however, the way the encryption key is created looks slightly different to how it was created in the original source code.
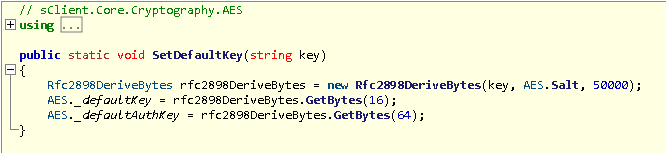
We click on the SetDefaultKey function, which is called with the encryption key as a parameter; the function seems to be deriving an auth key of 64 bytes and a default key of 16 bytes (looks like a key for AES) from the rfc2898derivebytes function, which is a PBKDF2 implementation that basically hashes a password and salt a specified number of times.
Now if we return to the Settings.cs file, you will see that the TAG is the first string to go through the decryption algorithm. It first calls this function:

This function Base64 decodes the string before passing the decoded result into the main decryption function. We click on the decrypt function and the main decryption algorithm shows; there are several processes that the code runs before returning the decrypted string and updating the Settings.cs file.
The decryption algorithm is different to the source code of Quasar RAT; therefore, some custom decryption is required.
The main decision here was how we were going to get the decrypted strings without running the malware – this was a static analysis task. We had three choices: use Python, C# or PowerShell. Each has benefits and drawbacks, but we ultimately decided to use PowerShell for its access to the .net framework functionality and quick scripting potential.
When analysing a piece of code – especially a decryption algorithm – it’s important to understand the journey the encrypted string takes. We know that before the above function is called, the encryption key is derived using rfc2898derivebytes, 16 bytes is stored in a variable called _defaultkey, and the string to be decrypted is Base64 decoded and then passed through to this function. These functions are relatively trivial to replicate in PowerShell; we visited MSDN documentation to understand what the functions return in more depth, but other than that it was quite simple.
This is what these functions look when like implemented in PowerShell, so we can begin the decryption of the 'Hosts' encrypted string.
$keyIterations = 50000;

$cipherTextBytes = ::FromBase64String("raR3v6Uh3eZjyl/kTiEo6EmxsncBwRzo4ZsV7rC3x38tMfl/BwZQsaIfnPYbawXi") # Hosts string from the Settings file

$input = "yZDGw8GOETy0vyifFT5m"

$array = 191,235,30,86,251,205,151,59,178,25,2,36,48,165,120,67,0,61,86,68,210,30,98,185,212,241,128,231,230,195,57,65 # Convert the Salt to Byte array # Hash the user passphrase with the salt provided

$keyBytes = (new-Object Security.Cryptography.Rfc2898DeriveBytes $input, $array, $keyIterations)

$defaultkey = $keyBytes.GetBytes(16)
Now that we have set up the encryption key, we need to begin the decryption process. There are a few things that we need to implement: MD5 hashing, RijndaelManaged encryption and a CryptoStream. When implementing these algorithms, it is important to follow the code step by step. (We do not need to do the preliminary checks that this code makes, such as checking the length of the keys or checking if they are NULL.)
First, the AES._defaultKey is assigned to an empty byte array and then hashed using MD5 hashing. PowerShell offers a quick, managed way to set up the MD5 crypto service provider object, so we use this to hash the defaultKey array.
$Hasher = New-Object -TypeName System.Security.Cryptography.MD5CryptoServiceProvider

$md5 = $Hasher.ComputeHash($defaultkey)
Next, we must set up the memory stream using the decoded Base64-inputted string from before. Then we must set up RijndaelManaged crypto service. The object created in PowerShell compared to the C# RijndaelManaged crypto service object is slightly different; within C# you do not have to specify padding, as it defaults to padding the rest of the bytes as zeros. In PowerShell, you need to specify this.
From here, we need to set up the IV and Key. The code reads the first 16 bytes of the Base64 decoded memory stream that we set up earlier and uses that for the IV, and the MD5 hashed key value as the key. The code to do this is shown below:
$rijndaelM = new-Object System.Security.Cryptography.RijndaelManaged

$rijndaelM.Padding = ::zeros #Set up Rijindael Managed object with padding of zeros

$memStream = new-Object IO.MemoryStream @(,$cipherTextBytes) # Memory stream set up using base64 decoded input

$array2 = new-Object byte 16

$memStream.Read($array2,0,16)

$rijndaelM.IV = $array2 # Assign IV and key to RijndaelManaged Object

$rijndaelM.Key = $md5

$decryptor = $rijndaelM.CreateDecryptor() # Starts the Decryptor using the Key and Initialisation Vector
Finally, we must set up a CryptoStream using the decryptor initialised from the RijndaelManaged.CreateDecryptor() function. Once this is completed, we will have our decrypted strings! The code looks like this:
$cryptoStream = new-Object Security.Cryptography.CryptoStream $memStream,$decryptor,"Read"

$decryptedByteCount = 0

$length = $ms.Length - 16 + 1

$array3 = new-Object byte $length

$decryptedByteCount = $cs.Read($array3, 0, $array3.Length)
That concludes this blog post, but fear not; we have created a lab doing this exact process so you can gain some practical experience.

See how to prove readiness with one platform.
See how Immersive One helps technical teams and leaders prove readiness, close capability gaps, benchmark progress, and report cyber resilience with confidence.


